Install and license ArcGIS Pro 3.x (runs only on Windows OS)
- ArcGIS Pro software executables can be copied from \\files\licensed\Products\ArcGIS\Pro3_6 to a local drive for installation. To mount this directory, join the Windows machine to the Princeton network. Instructions to do this can be found at https://workcontinuity.princeton.edu/remoteaccess .
- Map \\files.princeton.edu\licensed\Products\ArcGIS as a network drive
- Windows 11, 10 & 8.1:
- Copy the string \\files.princeton.edu\licensed\Products\ArcGIS.
- On your keyboard hold down the Windows and X keys, click run, and paste in the path above.
- Click OK.
- When prompted to enter a network password, authenticate as PRINCETON\<yournetID>
- In the list of directories in the ArcGIS directory, choose the directory Pro3_6.
- Right-click on the ArcGIS_Pro_36_197382.exe file and choose Copy.
- Paste the file to a local directory. Please note: it may take time to paste the file to a local drive.
- Run the executable file from your local copy.
- If you wish, follow the same procedure to install off-line help files (ArcGISProHelp_36_197413.exe) and the Data Interoperability Extension (ArcGISPro_36_Data_Interop_Ext_197571.exe) from the Pro3_5 directory. These two packages are optional. ArcGIS Pro 3.6 runs fine without them.
- Install any patches to ArcGIS Pro 3.6 after installing the software (these files have ".msp" as an extension).
- ArcGIS Pro is integrated with ArcGIS Online, hosted by Esri for Princeton University. Licenses to run ArcGIS Pro are available to Princeton users who have logged in to https://pumagic.maps.arcgis.com. Select the "by URL" option and enter https://pumagic.maps.arcgis.com to log in to this site. Then select the Princeton University button.
- Authenticate using your Princeton NetID and password on the CAS screen that opens, and use DUO to verify. This will create an ArcGIS Online account to use for on-line resources and publishing with ArcGIS Pro. This step should be done before opening ArcGIS Pro itself.
- Open ArcGIS Pro. As you did with ArcGIS Online, select the Princeton University button and authenticate. ArcGIS Pro should then open. Your first name should appear in the upper right of the ArcGIS Pro window, followed by (Princeton University GIS). This indicates that you have signed in to the ArcGIS Online portal.
- If ArcGIS Pro fails to open, click on the “Configure your licensing options” statement. If that statement is not visible, click on Settings (the gear icon) and choose the Licensing option. In either case this will open the Licensing window.
- In the Licensing window that opens, check that the License Type is “Named User License” and the Licensing Portal is https://www.arcgis.com.
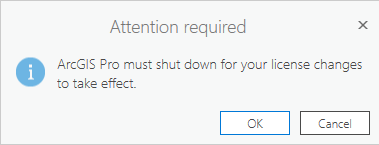
- If you made any changes, you will get a message that ArcGIS Pro must shut down for your license changes to take effect. Press OK and start ArcGIS Pro again.
